This is a quick walk through of how to test WordPress install on a dedicated IP without pointing domain or DNS. When should you test a WordPress install prior to pointing your domain? Anytime you migrate a WordPress install to a new server and don’t want to risk any down time due to issues discovered after the sometimes lengthy DNS propogation. This same method can also be used on shared IPs, but the instructions vary slightly for most hosting service.

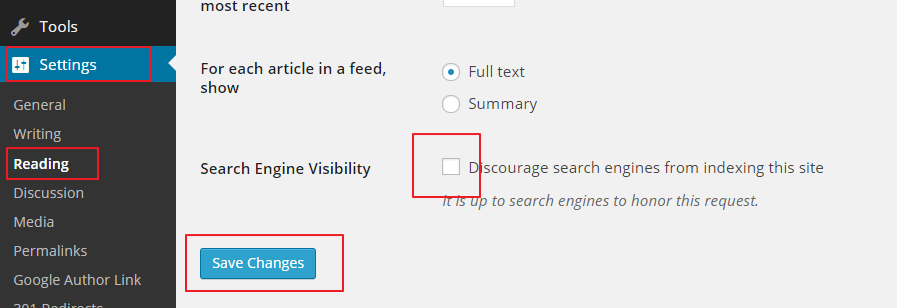
*Note that this is for a quick test. If you’re going to leave your install in a staging environment for a lengthy period of time then I recommend removing your Google Analytics code from the staging site and also no indexing your site by making it private:
WordPress 4.0 +: Settings > Reading > Discourage Search Engines From Indexing This Site:
What You Need To Test WordPress Install On Dedicated IP Without Pointing the Domain
- You need to have your files and database already migrated – WordPress instructions here
- You need access to your cPanel
- You need to know your IP address – in this case, your dedicated IP address
How To Test WordPress Install On Dedicated IP Without Pointing Domain
- Plug your IP address in your browser address bar and check to see if you homepage returns – it should. If it doesn’t try to access the WordPress admin interface: 11.11.11.11/wp-admin < use your actual IP. If neither works, you migration had a hiccup and I’d first take a look at wp-config settings.
- If your homepage returned, great, you know your site likely works. However, we want to test the entire site not just the homepage before pointing the domain. You’ll note if you click any navigation it’ll shoot you to your old site, the actual domain name, which is likely still live.
- Change permalink structure in PHPMyAdmin in order to browse/test entire site before pointing domain. In cPanel access PHPMyAdmin. Find the applicable database. Find a file named database_options where “database” = the name of your database. Update all uses of your domain name with your dedicated IP address. WordPress 4.0 + this will only be one use in line 1.
- Go back to your IP in your browser address bar and test your WordPress install homepage and deep pages ALL on the new server.
- Does your site work? Revert changes in step three above and make your site accessible to search engines if you modified privacy settings.
- Point your DNS to your new working install.
That’s how to test WordPress install on dedicated IP without pointing domain or DNS.