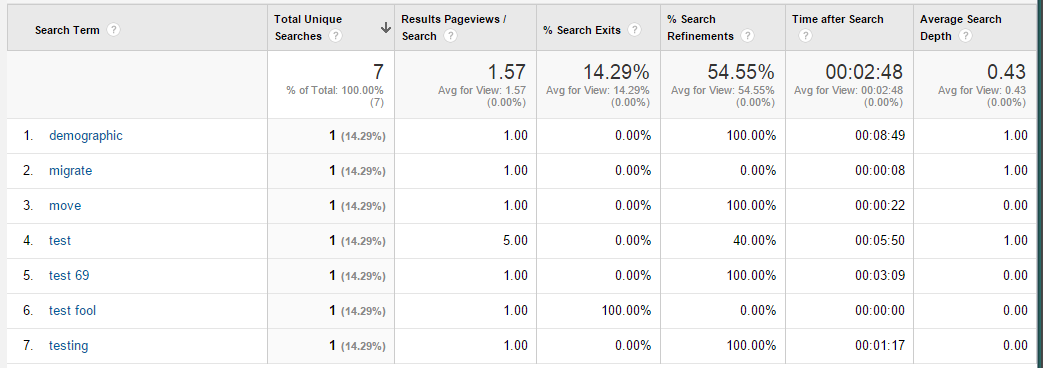
Below are quick direction to migrate and host iPhoto library from network storage such as a network area storage (NAS) device. I personally host my iPhoto library from a network storage, but there are negatives.
Pros and Cons of Hosting iPhoto Library from Network Storage Device
Pros:
- Bulk storage, which is necessary with the proliferation of SSDs in primary devices
- Single storage and iPhoto library for access across devices
- Single iPhoto library, or shared iPhoto library, can be accessed from multiple devices – using OSX as this is an iLife applications
- Functionality reflecting keeping your library local
Cons:
- Network drive may not auto-connect and you may need to point to the drive on occasion
- Less responsive due to network latency and bandwidth limitations
- Same iPhoto limitations where you can’t access the actual image file “containers” just an iPhoto library file for use with iPhoto – this means this file is useless on a Windows machine unless you export your iPhoto library as JPG etc.
What you need to transfer your iPhoto Library to network storage device:
- A Mac with any recent version of iLife for iPhoto
- A network storage device such as a NAS, which must already be mapped*
- Any external hard drive, for which you must have connection to for this process
How to Transfer to and Host iPhoto Library from Network Storage Device
- Quit iPhoto if open.
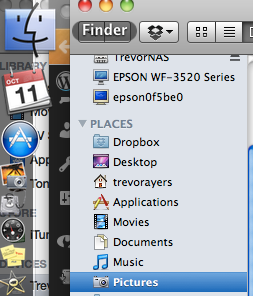
- Locate your iPhoto Library, which is currently hosted locally. This path is slightly different for various versions of iPhoto. Newer versions have one file named “iPhoto Library.” I’ve provided the paths below. If you’re unsure if this is the right file hit command + i on it and check for the file size to see if it’s large enough to contain your photos. All paths to iPhoto library start Finder > Pictures:
iPhoto 10:
~/Pictures/iPhoto Library.photolibrary/Masters/
iPhoto 9:
~/Pictures/iPhoto Library/Masters/
- Transfer your iPhoto library to network drive. Open up your network drive (SMB etc.), USB drive or otherwise and drag your iPhoto Library file over. Alternatively, copy/paste. Time will vary depending on size/bandwidth.

- Wait for transfer to finish.
- Access new iPhoto library location from local machine. I always move the cut/paste my iPhoto library from my local machine’s picture folder to the desktop for testing. Once this file is not in your local “pictures” directory launch iPhoto.
- Upon launching iPhoto, you will be prompted with a message that your iPhoto library cannot be found. Click “Choose Library.”
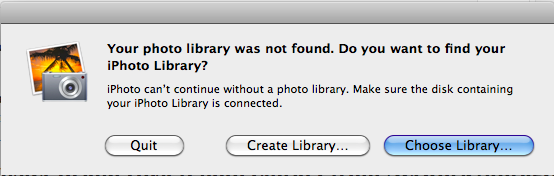
- Navigate to your new copied iPhoto library on your network drive or attached storage and double click the “iPhoto Library” file.
- iPhoto will now launch and any device synched will use this new iPhoto library on your network storage device.
- If everything worked as necessary and you feel you have necessary redundancy for backup of your images you can delete the local file now on your desktop.
Note that step 6 may need to be repeated if your local machine does not connect to the network storage device on boot up.
That’s it, that’s how you migrate and host and iPhoto library from a network storage device such as a NAS.